LoraWan Gateway & IAQ Sensor Integration w/Data Retrieval — Part 2
In Part 1 we talked about how to into setting up a LoraWan Gateway and IAQ Sensor. We’ll retouch on that slightly using the View Builder IOT product. Following that we’ll talk about how to show data that has been pushed to VB IOT.
Adding a Gateway:
LoraWan devices push data to a gateway wirelessly. The gateway then sends data to the cloud via the internet.
Before you run through the gateways setup process add a gateway to VB IOT first.
1. Click on the plus + sign to add a gateway. You will the gateway id.

2. Save the entry and now go through your Gateways setup process. The gateways setup process is where it connects to the remote sever to send data to. It usually sends data out on port 1700.

The last step when setting your gateway up is to connect it the local internet connection where the gateway resides. If its wireless, the network key is required. Note: The reason this is done is because once its connected the gateway won’t allow you to log onto to it via the gateways browser for security reason. You will have to run the setup again if you want to change any settings.
The gateway will automatically start sending data to the LoraWan server. You can check the Last Seen timestamp to verify this. Can sometimes take a while for data be sent.
Next you should add your device profile and start adding devices.
Adding a Device Profile:
A Device Profile defines the device capabilities and boot parameters that are needed by the Server for setting the LoRaWAN® radio access service. These information elements shall be provided by the end-device manufacturer. We also maintain a list of device profile templates which is updated regularly.
1. Go to the device profiles section, and Click on the plus + sign to add a device profile.
2. Click on the “Select Device Profile Template”. You will need to have some basic information regarding your device. E.g. Vendor, device name, firmware version, and region.

3. Click Apply Template
Next you should start adding applications and devices by going to that section.
Adding Applications/Devices:
An application is a collection of devices with the same purpose / of the same type. Think of a weather station collecting data at different locations for example.
Before you can add a device, you must add an application.
1. Go to the Manage LoRaWAN Applications section, and Click on the plus + sign to add a new application.

2. Specify a friendly name and click Save.
3. Click on the app you created in step 3 to start adding devices.
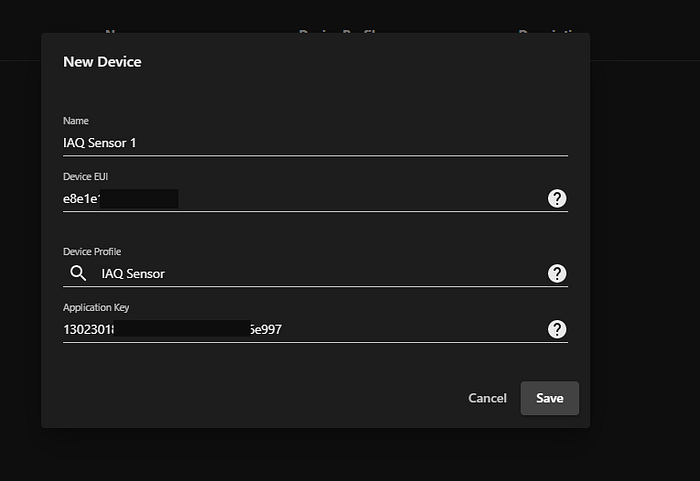
4. Click on the plus + sign to add a new device. The following values are required:
Name: a friendly name for the device.
Device EUI: The DevEUI is a globally-unique Extended Unique Identifier (EUI-64) assigned by the manufacturer, or the owner, of the end-device.
Device Profile: These are the device profiles you have added in the device profiles section.
Application Key: The application key (AppKey) is only known by the device and by the application. Dynamically activated devices (OTAA) use the Application Key.
Click Save
The device will automatically start sending data through the gateway you setup up earlier. It can take some time before telemetry data is sent. If you’re switching from another LoRaWAN server, then you may need to take the battery out for a few hours to it can register to a new server. Refer to the hardwares trouble shooting guide for more information.
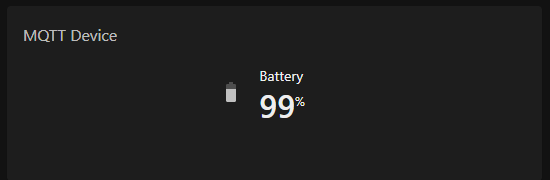
Now you can start creating views to show telemetry data via its mqtt topic. All device data is automatically sent to our mqtt server. Historical telemetry data is stored in our database and can also be shown on screen.
Retrieving LoRaWAn Data:
Retrieving LoRaWAn data. With your gateways, device profiles, and application/devices all setup, you can start creating views to show telemetry data via its mqtt topic. All device data is automatically sent to our mqtt server. Historical telemetry data is stored in our database and can also be shown on screen.
Before you can add a device, you must add an application.
1. Navigate to your Applications, then Devices by clicking on the application.
2. Copy the mqtt topic id. We’ll use this later when setting up the widget.

3. Go to View Builder Designer. Create a view and add an MQTT widget, e.g. device value. Use the mqtt topic copied earlier to setup the widget.

4. Apply the view to a navigation menu item. Navigate to the view.
Troubleshooting Data not showing:
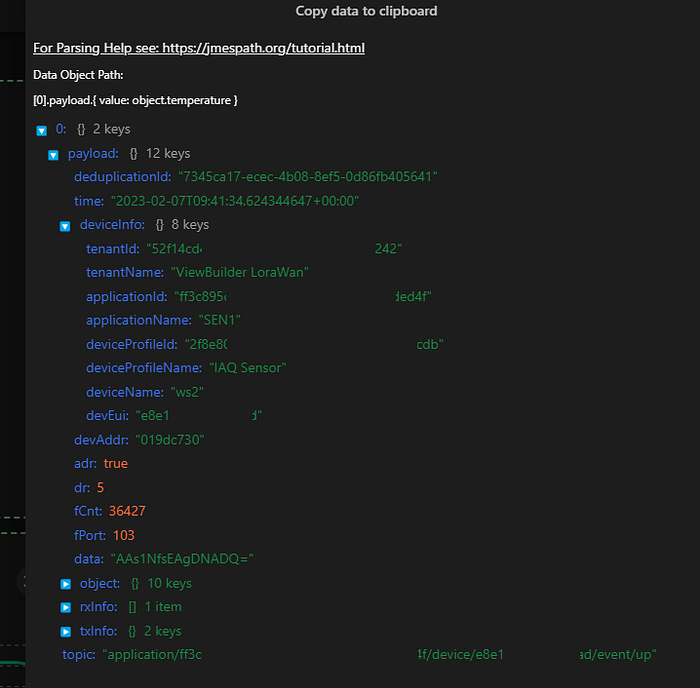
When you have navigated to the view, and you’re a super user, you can press ctrl + e on your keyboard to bring up the raw data from the response. Make sure you JSON object path is set correctly. When the json response is returned, this is the key for the object we are interested in. See JMESpath examples here: https://jmespath.org/tutorial.html OR see the help section.
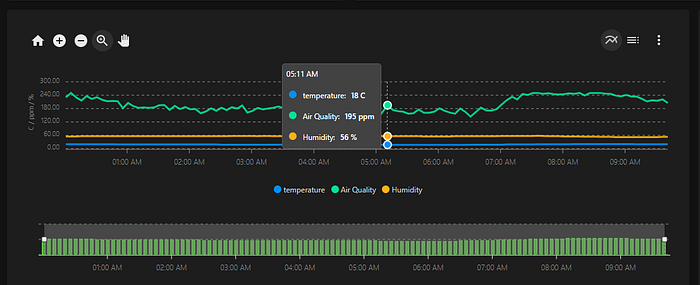
Retrieving LoRaWAn Telemetry History:
Telemetry history is saved in the database. Everytime your device sends data, it is automatically saved. This allows us to query the database and pick up the historical values. We’ll need the topic id copied earlier.
Add a historical telemetry data widget to you view.
Example:
Thats it for this article. You can find out more information regarding our LoRaWAN solution here:
Features:
✅ AS923, AS923–2, AS923–3, AS923–4 AU915, CN470, CN779, EU433, EU868, IN865, KR920, RU864, US915, ISM2400 (LoRaWAN 2.4 GHz) supported regions.
✅ Class A, Class B unicast & multicast, Class C unicast & multicast device classes
LoRaWAN 1.0.0, LoRaWAN 1.0.1, LoRaWAN 1.0.2, LoRaWAN 1.0.3, LoRaWAN 1.0.4, LoRaWAN 1.1.0 LoRaWAN versions
✅ RP002–1.0.0, RP002–1.0.1, RP002–1.0.2, RP002–1.0.3 regional parameters
✅ Display Widgets (charts, gauges, maps, etc) & Telemetry Data using View Builder™©.
